> ## Documentation Index
> Fetch the complete documentation index at: https://docs.prefect.io/llms.txt
> Use this file to discover all available pages before exploring further.
# How to create a webhook
> Learn how to setup a webhook in the UI to trigger automations from external events.
This page shows you how to quickly set up a webhook using the Prefect Cloud UI, invoke it, and create an automation based on the received event.
## Trigger an Automation from an External Event
Here's how to set up a webhook and trigger an automation using the Prefect Cloud UI.
### 1. Create a Webhook in the UI
Navigate to the **Webhooks** page in Prefect Cloud and click **Create Webhook**.
You will need to provide a name for your webhook and a Jinja2 template. The template defines how the incoming HTTP request data is transformed into a Prefect event. For example, to capture a model ID and a friendly name from the request body:
```JSON theme={null}
{
"event": "model-update",
"resource": {
"prefect.resource.id": "product.models.{{ body.model_id}}",
"prefect.resource.name": "{{ body.friendly_name }}",
"run_count": "{{body.run_count}}"
}
}
```
This template will look for `model_id`, `friendly_name`, and `run_count` in the body of the incoming request.
 After saving, Prefect Cloud will provide you with a unique URL for your webhook.
### 2. Invoke the Webhook Endpoint
Use any HTTP client to send a `POST` request to the unique URL provided for your webhook. Include the data you want to pass in the request body. For the example template above:
```console theme={null}
curl -X POST https://api.prefect.cloud/hooks/YOUR_UNIQUE_WEBHOOK_ID \
-d "model_id=my_model_123" \
-d "friendly_name=My Awesome Model" \
-d "run_count=15"
```
Replace `YOUR_UNIQUE_WEBHOOK_ID` with your actual webhook ID.
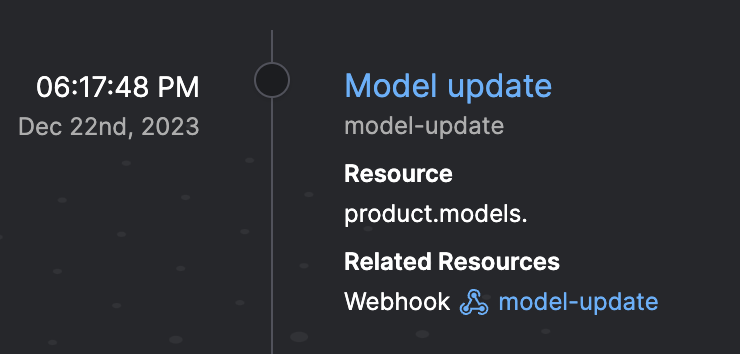
### 3. Observe the Event in Prefect Cloud
After invoking the webhook, navigate to the **Event Feed** in Prefect Cloud. You should see a new event corresponding to your webhook invocation.
After saving, Prefect Cloud will provide you with a unique URL for your webhook.
### 2. Invoke the Webhook Endpoint
Use any HTTP client to send a `POST` request to the unique URL provided for your webhook. Include the data you want to pass in the request body. For the example template above:
```console theme={null}
curl -X POST https://api.prefect.cloud/hooks/YOUR_UNIQUE_WEBHOOK_ID \
-d "model_id=my_model_123" \
-d "friendly_name=My Awesome Model" \
-d "run_count=15"
```
Replace `YOUR_UNIQUE_WEBHOOK_ID` with your actual webhook ID.
### 3. Observe the Event in Prefect Cloud
After invoking the webhook, navigate to the **Event Feed** in Prefect Cloud. You should see a new event corresponding to your webhook invocation.
 ### 4. Create an Automation from the Event
From the event details page (click on the event in the feed), you can click the **Automate** button.
### 4. Create an Automation from the Event
From the event details page (click on the event in the feed), you can click the **Automate** button.
 This will pre-fill an automation trigger based on the event you just created.
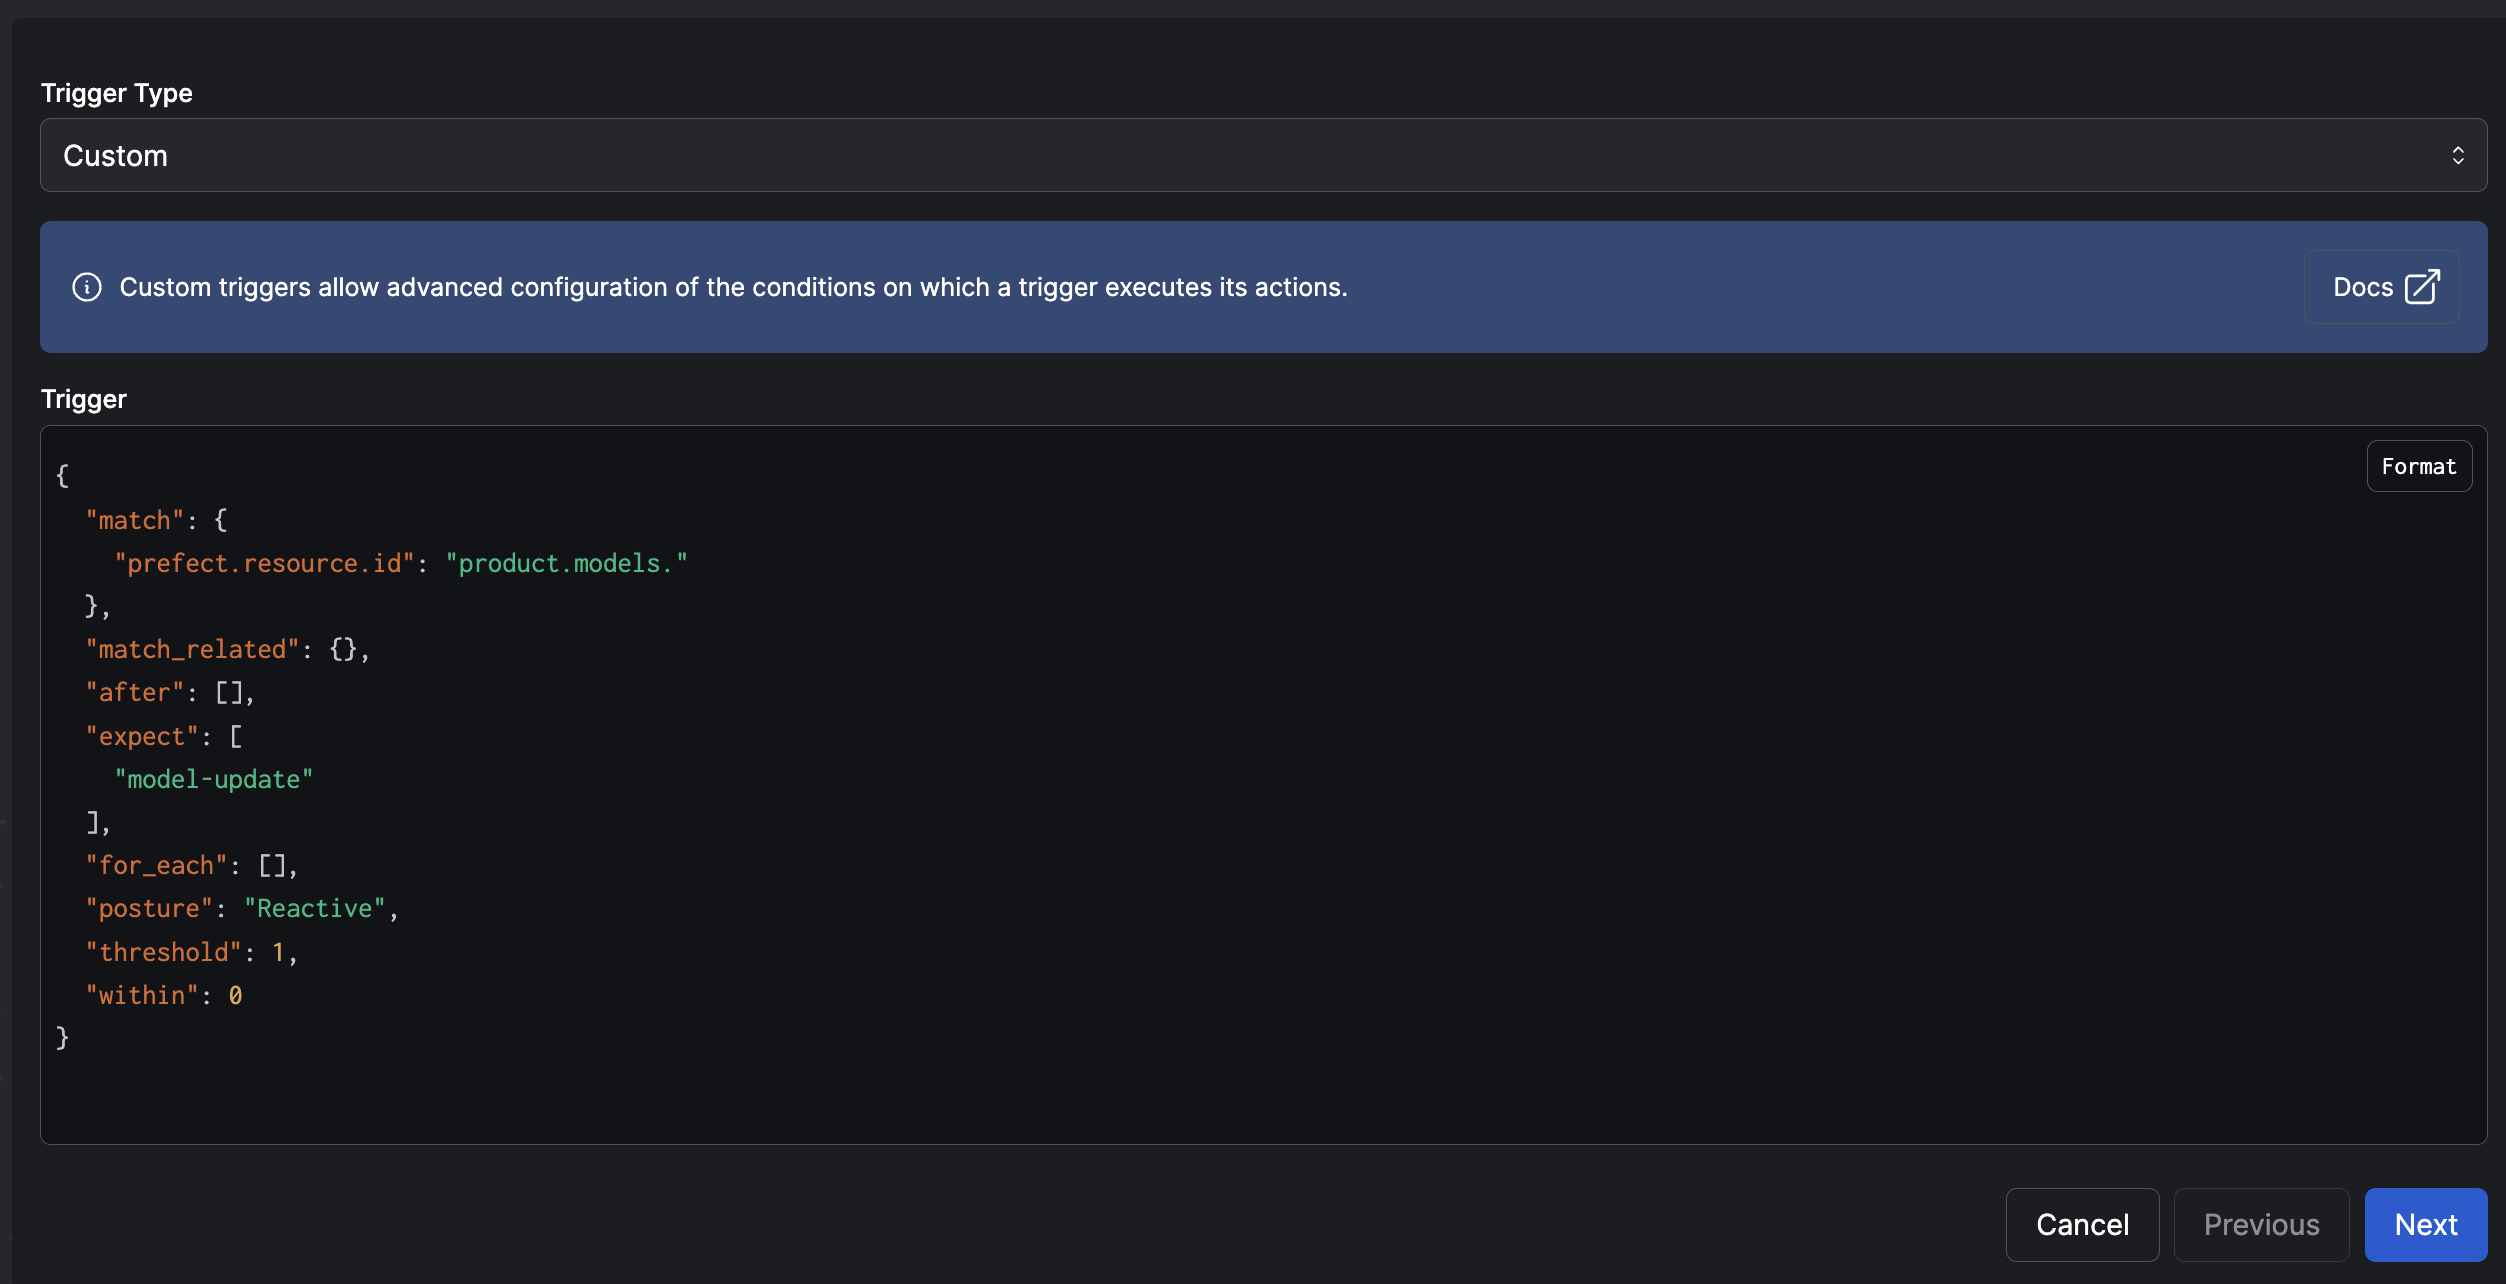 Click **Next** to define the action(s) this automation should perform, such as running a deployment or sending a notification.
## Troubleshooting Event Reception
If you've invoked your webhook but don't see the expected event in Prefect Cloud, or the event data isn't what you anticipated:
* **Check the Event Feed**: Look for any events related to your webhook, even if they don't match your exact expectations.
* **Look for `prefect-cloud.webhook.failed` events**: If Prefect Cloud encountered an error processing the webhook (e.g., an invalid template or malformed request), it will generate a `prefect-cloud.webhook.failed` event. This event contains details about the received request and any template rendering errors.
* **Verify your request**: Double-check the URL, HTTP method, headers, and body of the request you sent to the webhook.
* **Review your template**: Ensure your Jinja2 template correctly accesses the parts of the HTTP request you intend to use (e.g., `body.field_name`, `headers['Header-Name']`).
For more in-depth troubleshooting of webhook configuration and template rendering, see [Troubleshooting Webhook Configuration in the Concepts documentation](/v3/concepts/webhooks#troubleshooting-webhook-configuration).
## Further reading
For more on webhooks, see the [Webhooks Concepts](/v3/concepts/webhooks) page.
Click **Next** to define the action(s) this automation should perform, such as running a deployment or sending a notification.
## Troubleshooting Event Reception
If you've invoked your webhook but don't see the expected event in Prefect Cloud, or the event data isn't what you anticipated:
* **Check the Event Feed**: Look for any events related to your webhook, even if they don't match your exact expectations.
* **Look for `prefect-cloud.webhook.failed` events**: If Prefect Cloud encountered an error processing the webhook (e.g., an invalid template or malformed request), it will generate a `prefect-cloud.webhook.failed` event. This event contains details about the received request and any template rendering errors.
* **Verify your request**: Double-check the URL, HTTP method, headers, and body of the request you sent to the webhook.
* **Review your template**: Ensure your Jinja2 template correctly accesses the parts of the HTTP request you intend to use (e.g., `body.field_name`, `headers['Header-Name']`).
For more in-depth troubleshooting of webhook configuration and template rendering, see [Troubleshooting Webhook Configuration in the Concepts documentation](/v3/concepts/webhooks#troubleshooting-webhook-configuration).
## Further reading
For more on webhooks, see the [Webhooks Concepts](/v3/concepts/webhooks) page.